Hydraulic Plastic Plump Can Priming
Serialized Tab Data
Home › Repair Specifications › Hydraulic Plastic Plump Can Priming
Hydraulic Plastic Plump Can Priming
PROCEDURE
- Fill the pump bucket with the required amount of water and grade fluid. The amount of fluid needed will be determined by the mixing instructions on the bottle.
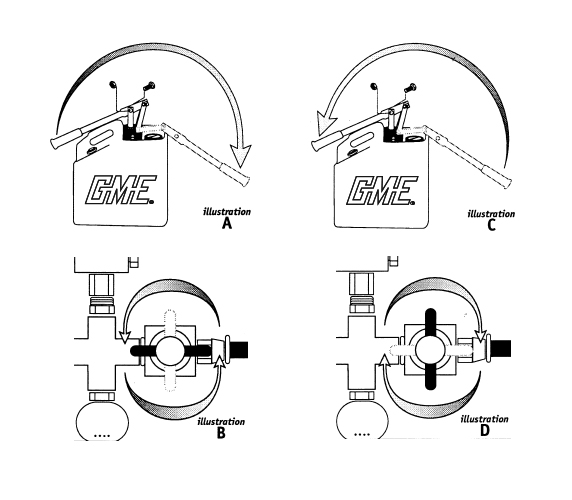
- Remove the wing nut and stud assembly that connects the handle to the plunger rod. Then proceed to flip the handle off the plunger rod leaving it hang off the front of the bucket. (See illustration A)
- Turn 1/4 turn valve so that it is inline with the drain hose allowing the fluid to return to the bucket. (See illustration B)
- Place stud assembly back through the hole in the plunger rod. Grip the stud assembly like a T-handle and pump the plunger rod up-down vigorously until you start to hear fluid coming back into the bucket through the return line. This indicates that you have primed the bucket.
- To test the pump bucket reattach the handle to the plunger rod using the stud assembly. Place the stud assembly through the middle hole on the handle (See illustration C). Then turn the 1/4 turn valve to the right putting it in line with the pressure hose (See illustration D).
- Grip the handle and proceed to pump up-down until you start to build pressure in the pressure hose. Continue to pump until your gauge has reached 750 lbs. – 1500 lbs.
- Turn 1/4 turn valve back 90 degrees left in line with the drain hose. This will release the pressure in the pressure hose (See illustration B). This completes the priming procedure.


